The Easiest Way To Deploy Your Machine Learning Models In 2022: Streamlit + BentoML + DagsHub
Deploy Models As Lightweight APIs With A User-Friendly Interface
Apr 19 2022 • Written By Bex Tuychiev

Introduction
You have a ready machine learning model. Now what? What do you do with it? Do you keep it inside your Jupyter like a prized possession for no one to see? No, you make it as stupidly easy as possible for others to share and play around with your work. In other words, you deploy the model.
But how? Should you just share the model as a file? No, that would be the worst.
How about a Docker container? Yeah, that is better — the user will have it all to run your model locally. But… they would still need to do it inside a coding environment. Not very convenient.
Then, what about an API? Well, good luck explaining an API to a non-programmer.
Hey, what if you built a web app? Yes, this seems to be the best option. But how to build it? Don't you need to learn a web framework?
Well, good news — you won't have to do any of the above. In this article, I will show a deployment method that enables you to serve your model as an API, a Docker container, and a hosted web app, all within a few minutes and a couple of short Python scripts.
Sounds great? Keep reading.
What Problem Are We Solving?
Today’s deployment method works for any model architecture from any ML/DL framework. But, like we've been doing for the past two articles, we will continue working on the Pet Pawpularity dataset.
The Petfinder.my dataset collected this image dataset of cats and dogs and gave each a cuteness score using their in-house scoring algorithms. We've been trying to use this dataset to predict the cuteness score of a pet given its image.
Pet Pawpularity competition homepage.
The dataset was used to host the Pet Pawpularity competition on Kaggle, hoping that top solutions improve pet adoption.
In the first article, we performed EDA on the images and their metadata and outlined our approach to solve the problem and the tools to use use on the way.
The second article was a comprehensive tutorial on tracking your machine learning experiments and finding the best model to predict the cuteness score.
The final article will show how to deploy a Keras image regression model as an API and a web app to make it accessible to everyone, programmers and regular users.
What Tools Will We Use To Deploy?
It is hard to agree on the best tools to serve models in production because each problem is unique, and their solutions have different constraints.
Therefore, I wanted to choose a solution or a set of tools that would benefit as many people as possible. The solution should be simple enough so that it takes only a few minutes to whip up a working prototype and serve it online and, if needed, can scale to larger-scale problems.
The core component of this solution is the BentoML package. It is one of the latest promising players in the MLOps landscape and has already amassed half a million downloads on GitHub.
Its purpose is to serve ML models as API endpoints with as few lines of code as possible and without the hassles of other frameworks like Flask. It works with virtually any ML framework:
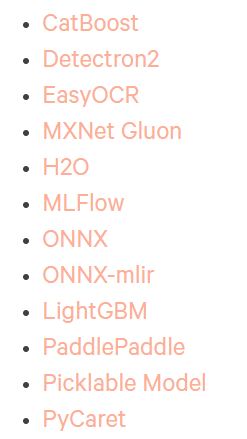
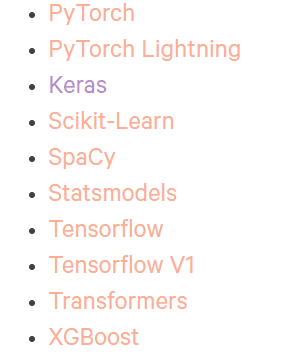
BentoML docs — accepted frameworks.
Jumping a few steps ahead, you can check out this link that contains the deployed API we will build in this article.
The server will take a minute to load.
The deployment shouldn't just stop at an API, either. After all, APIs are only for programmers, and you need something the non-programming community can interact with as well. That's where Streamlit comes in.
Streamlit isn't probably new to you as it is already established as a go-to library for creating minimalistic web apps for almost any type of ML application.
Since we build the Streamlit UI on top of an API, the web app will be even more lightweight. You won't have dependency issues as you will only need the requests library to process requests to the BentoML API through the Streamlit app.
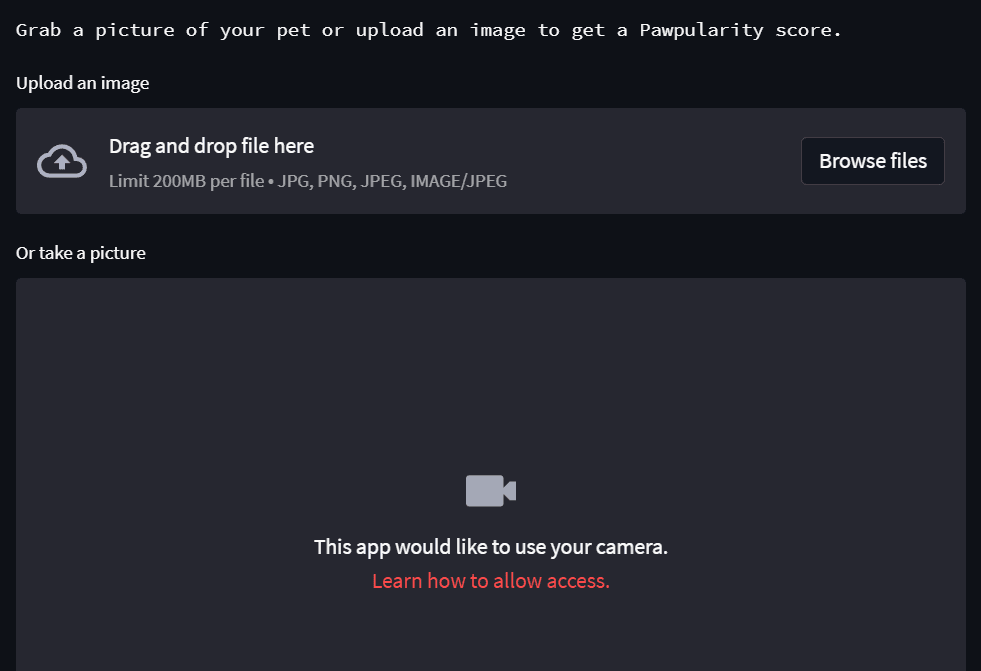
Below, you can see the app we will build in this article:
Last but not least, we will use DagsHub again to manage the project as a whole. DagsHub is the GitHub for data professionals and allows you to do 360-degree machine learning.
You can use a DagsHub repository for many tasks:
- Hosting code: has full support for Git (just like GitHub).
- Storage: has dedicated storage for data & model storage managed by DVC
- Experiment tracking: has support for MLflow Tracking and Git Tracking.
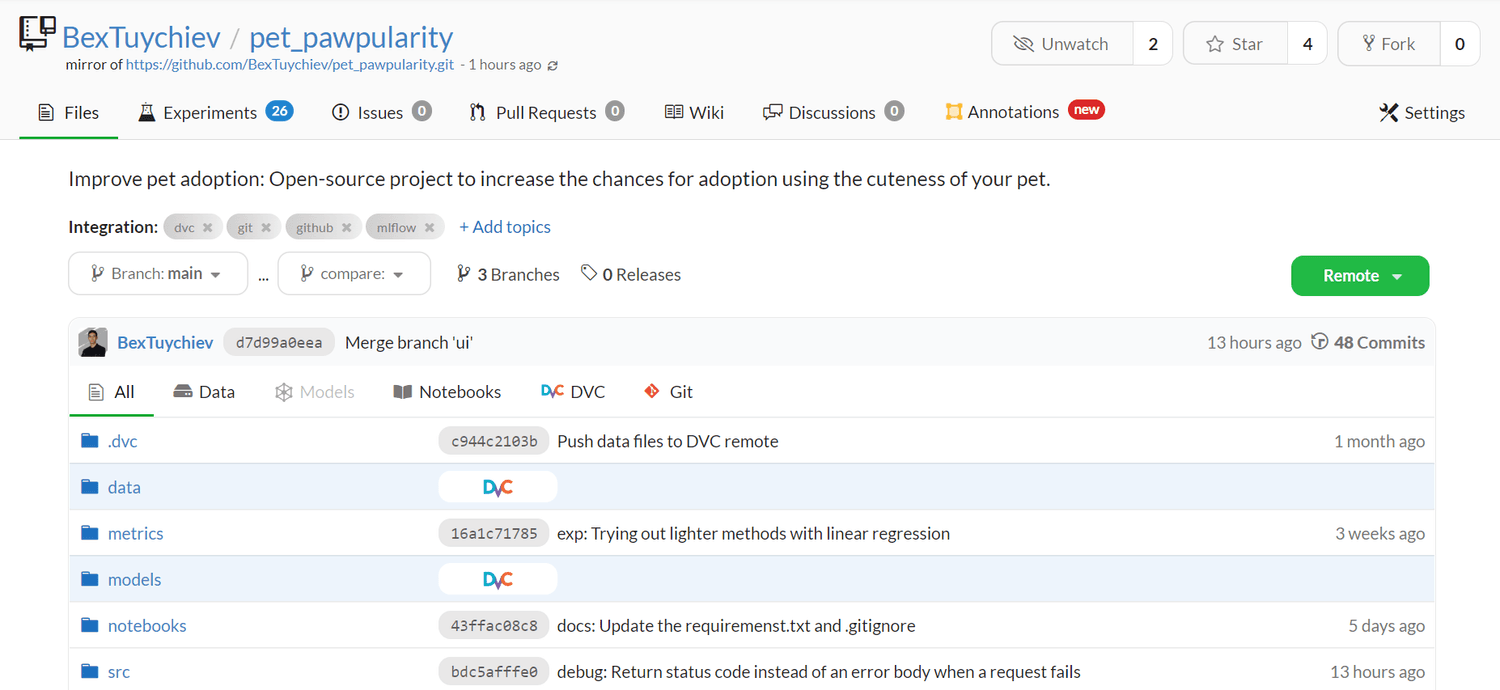
The pet-pawpularity DagsHub repo.
We've used DagsHub most heavily in the second part during experimentation:
The machine learning lifecycle isn't just about deployment. For a model to be successful in production, it needs a solid foundation in infrastructure. DagsHub allows you to build that foundation.
Now, let's jump into the central part of the article and start by explaining how to use BentoML to create an API endpoint for a prediction service.
Step 1: Save The Best Model To BentoML Local Store
All code snippets of this section is taken from the project repo — training.py.
Let's start by importing the necessary libraries:
import logging

import bentoml  # pip install bentoml --pre
import joblib
import tensorflow as tf
Make sure you install bentoml with the --pre tag since it is still in preview.
Below, we will create a couple of helper functions to create and train a Keras convolution model:
def get_keras_conv2d():
    """A function to build an instance of a Keras conv2d model."""

    model = ...

    return model


def fit_keras_conv2d():
    """
    A function to train a Keras conv2d model.
    """
    model = get_keras_conv2d()

    #-- Fit model with early stopping and 30 epochs on the images --#

    return model
I've left out the body of the first function, which creates a Conv2D instance with three hidden layers and dropout, MaxPool layers in-between. We don't have to focus on model architecture too much.
fit_keras_conv2d uses the first function and trains the obtained model with early stopping and 30 epochs.
Next, we create a function to save the model to BentoML local store:
def save(model, bentoml_name, path):
    """
    A function to save a given model to BentoML local store and with joblib.
    """
    bentoml.keras.save(bentoml_name, model, store_as_json_and_weights=True)

    joblib.dump(model, path)
The keras.save function saves Keras models in a format suitable for other BentoML operations.
So, let's run these functions to get a ready model:
def main():

    model = fit_keras_conv2d()

    logging.log(logging.INFO, "Saving...")

    save(model,
         "keras_conv2d_smaller",
         "models/keras_conv2d_smaller.joblib")

    logging.log(logging.INFO, "Done!")


if __name__ == "__main__":
    main()
After the training and saving are done, you can run the below command to get a list of models in the BentoML store:
$ bentoml models list
The saved models are officially called tags in the BentoML docs. By default, all models will be saved inside your home directory and the bentoml/models folder with a random tag, in case there are multiple models with the same name.
If you go into the given path, you will find files like these:
checkpoint
model.yaml
saved_model_json.json
saved_model_weights.data-00000-of-00001
saved_model_weights.index
You can always load the model back using the load_runner function preceded by the relevant framework name:
model = bentoml.keras.load_runner("keras_conv2d_smaller:latest")

# Load a sample image from memory
img = ...

print(model.run(img))
After loading, the model can be used for prediction using its run method, which calls the predict method of Keras Model object under the hood.
Step 2: Create The Service
All code snippets of this section is taken from the project repo — service.py.
Now, we only need a few lines of code to convert the saved model into a functioning API.
First, we write a function to create a Service object of BentoML that takes care of all API logic without any effort on our part.
After loading the model back with the load_runner function, we pass it to the Service method with an arbitrary name.
def create_bento_service_keras(bento_name):
    """
    Create a Bento service for a Keras model.
    """
    # Load the model
    keras_model = bentoml.keras.load_runner(bento_name)

    # Create the service
    service = bentoml.Service(bento_name + "_service", runners=[keras_model])

    return keras_model, service


model, service = create_bento_service_keras("conv2d_larger_dropout")
After that, we create an API endpoint that handles our POST requests. You create endpoints in BentoML by defining a function decorated with the api method of the service object we just created:
import numpy as np
import bentoml
from bentoml.io import Text, NumpyNdarray
from skimage.transform import resize


# Create an API function
@service.api(input=Text(), output=NumpyNdarray())
def predict(image_str) -> np.ndarray:
    """
    Predict pet pawpularity from an image using the given Bento.
    """
    # Convert the image back to numpy array
    image = np.fromstring(image_str, np.uint8)
    image = resize(image, (224, 224, 3))
    image = image / 255.0

    result = model.run(image)

    return result
Before discussing the body, let's talk about the service.api decorator. It has two required parameters - input and output.
You should define these parameters based on the type of data you will send and get back from the endpoint.
The above predict endpoint returns a cuteness score when we send a request with an image. So, I've defined the input as Text() because we will be sending the NumPy image array as a string. The output should be NumpyNdarray() because when we call model.run(image), the return data type will be a Numpy array.
Getting the correct data type for the endpoint is important. You can read this page of the BentoML docs on other types of data you can process.
As for the body, you should write all preprocessing logic to the image before you call model.run. Before training, I resized the images to (224, 224, 3) and normalized them by dividing their pixel values by 255. So, I've performed those steps inside the endpoint function as well.
Important: If you are using other frameworks like Sklearn for tabular data, make sure you run all your preprocessing steps inside the API endpoint as well. We can achieve this by pickling all your processing functions and calling them inside the
_predict_function, so there won't be any data leakage or you won't pass incorrectly formatted data.
Now, to start a debug server for our API, you only need to put all the code into a single Python file, conventionally named service.py, in the root directory and call the below command:
$ bentoml serve service.py:service --reloa

The --reload tag makes sure that the local server detects changes to the service.py and updates the logic automatically.
From the GIF, you can see that the server is live at http://127.0.0.1:3000/ with a simple UI:

We can already send requests to the local server and get predictions for the images:
import requests
from skimage.io import imread

endpoint = "http://127.0.0.1:3000/predict"

# Load a sample image
img = imread("data/raw/train/0a0da090aa9f0342444a7df4dc250c66.jpg")

response = requests.post(endpoint, headers={"content-type": "text/plain"},
                    data=str(img))
Make sure to set the correct headers for your data type and send the image wrapped under the str function. Once again, you can find examples of requests with the correct content headers for each data type from this page of the docs.
Let's look at the response text:
>>> print(response.text)
[35.49753189086914]
And the image we sent was this:
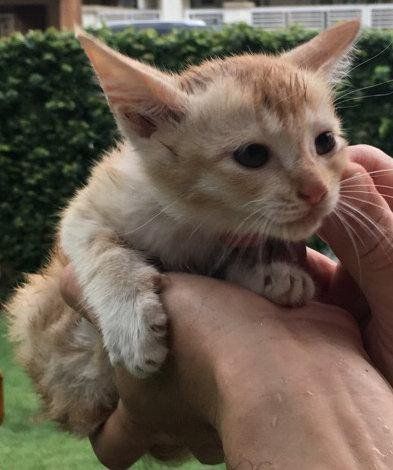
Image from the Pet Pawpularity dataset.

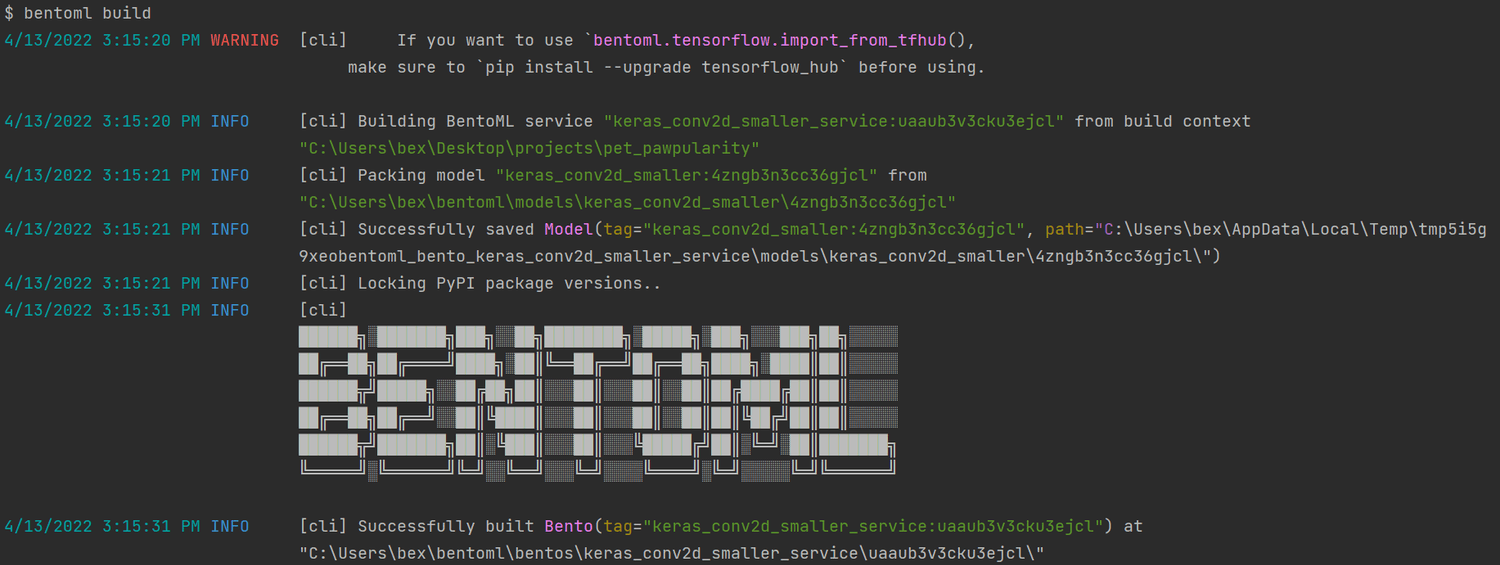
Step 3: Build The Bento
Now, we are ready to create our very first Bento.
The term Bento means an archive that contains everything to run our services or API online, including all the code, models, dependency info, and configurations for setup.
Building it starts with creating a bentofile.yaml file in the directory that is the same level as the service.py file (preferably, both should be in the project root):
service: "service.py:service"
include:
 - "service.py"
python:
  packages:
   - scikit_learn==1.0.2
   - numpy==1.22.3
   - tensorflow==2.8.0
   - scikit_image==0.18.3
The first line of the YAML file should contain the service file's name followed by the ":service" suffix. Next, you add all the files needed for the service.py file work without errors (data, helper scripts, etc.). Here, I only included the service file itself as we didn't use any additional scripts inside it.
Then, under Python and packages, you specify the dependencies and their versions. If you are not sure about the versions, there is a helpful little package I always use called pipreqs:
$ pip install pipreqs
$ pipreqs .
Calling pipreqs [path] creates a requirements.txt file with all the used packages you import and their versions in the given path like below:
bentoml==1.0.0a7
catboost==0.26.1
dagshub==0.1.8
joblib==0.17.0
keras==2.8.0
lightgbm==2.3.1
matplotlib==3.3.1
mlflow==1.24.0
numpy==1.22.3
pandas==1.3.2
scikit_image==0.18.3
scikit_learn==1.0.2
seaborn==0.11.0
skimage==0.0
tensorflow==2.8.0
tqdm==4.50.0
xgboost==1.4.2
After listing the dependencies, you only need to call bentoml build:
$ bentoml build
To see a list of all your Bentos, call bentoml list
$ bentoml list

Step 4: Deploy To Heroku
The build command saves a fresh bento inside the local store with the following tree structure:
├───apis
    │       openapi.yaml
    ├───env
    │   ├───conda
    │   ├───docker
    │   │       Dockerfile
    │   │       entrypoint.sh
    │   │       init.sh
    │   └───python
    │           requirements.lock.txt
    │           requirements.txt
    ├───models
    │   └───keras_conv2d
    │       │   latest
    │       │
    │       └───b52h7x5xpk2bejcl
    │               checkpoint
    │               model.yaml
    │               saved_model_json.json
    │               saved_model_weights.data-00000-of-00001
    │               saved_model_weights.index
    └───src
    │       service.py
    │   bento.yaml
    │   README.md
You can read what each of these sub-folders does from this page. The folder we are interested in is the env/docker one. It contains everything needed to build a fully functional Docker container, and we will use it to deploy our API online.
There are many options for this, like Amazon EC or Google Cloud Platform, but Heroku's most hassle-free platform.
Heroku is a popular cloud application platform that enables developers of any language to build and maintain cloud applications. If you haven't already, create an account and download the CLI, which you can use to create and manage your Heroku apps.
After installing, call login to authenticate your terminal session:
$ heroku login
This opens up a tab in the browser where you can log in with your credentials. Next, log in to the container registry:
$ heroku container:login
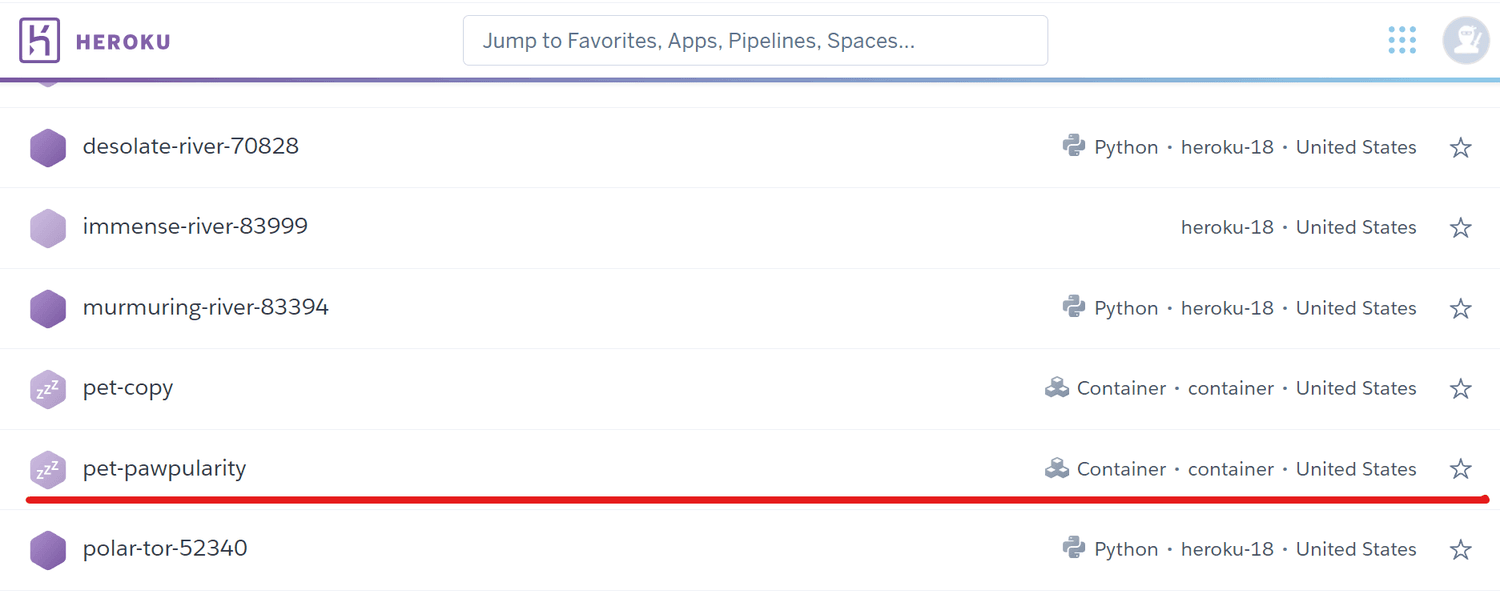
Now, let's create an app named pat-pawpularity:
$ heroku create pet-pawpularity
Afterward, the app should be visible at https://dashboard.heroku.com/apps:
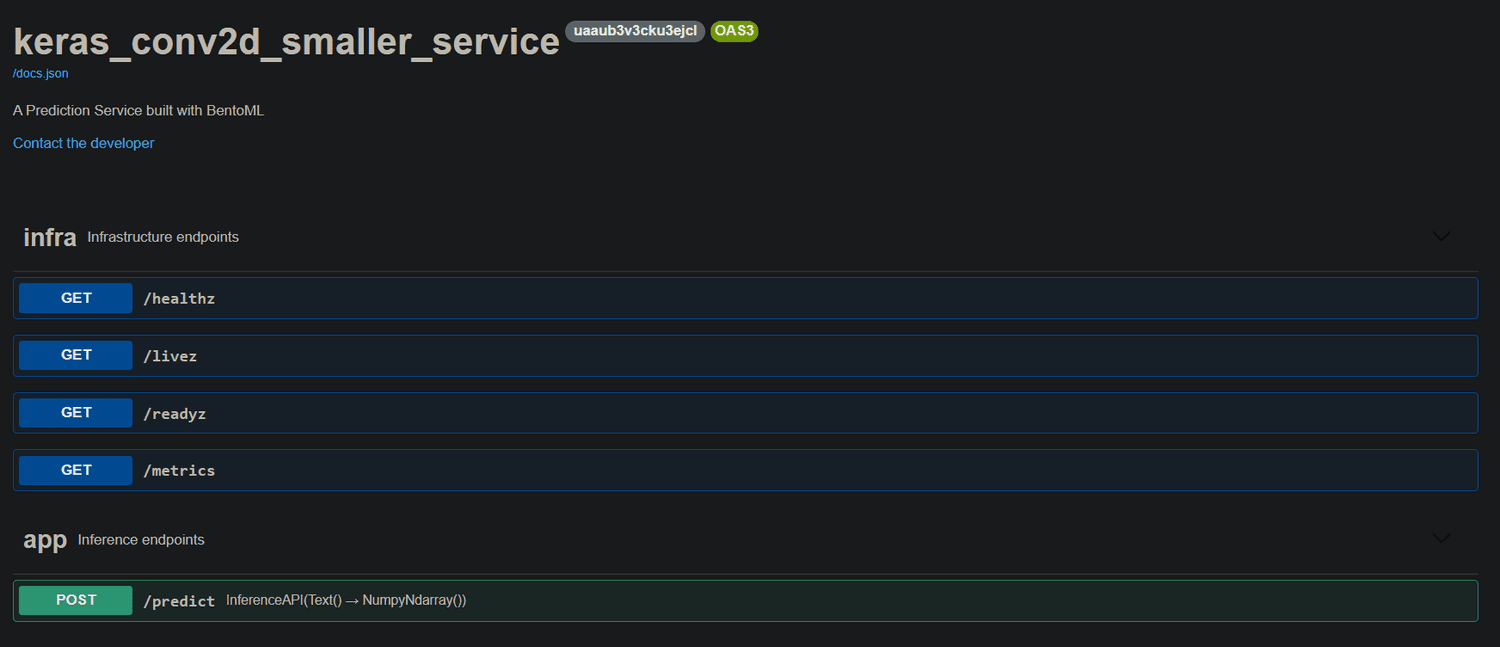
Now, we need to push our Bento to this app and deploy it online. To do that, we need to cd into the bento directory (which you can find with bentoml list) and inside the docker folder:
$ cd ~/bentoml/bentos/keras_conv2d_smaller_service/uaaub3v3cku3ejcl
$ cd env/docker
From there, you call this command:
$ heroku container:push web --app pet-pawpularity --context-path=../..
Depending on the size of the archive, the command will take a few minutes to finish.
Finally, you can release the app with the below command:
$ heroku container:release web --app pet-pawpularity
Now, you can go to https://pet-pawpularity.herokuapp.com/ to see the API online or go to the app's page on your dashboard to open it:

Now, anyone can send a request to this API. Let's try:
import requests
from skimage.io import imread

endpoint = "https://pet-pawpularity.herokuapp.com/predict"

# Load a sample image
img = imread("data/raw/train/0a4f658ae77b7e4209e22b79fe1c28cb.jpg")

response = requests.post(
    endpoint, headers={"content-type": "text/plain"}, data=str(img)
)

>>> print(response.text)
[27.414047241210938]
Step 5: Build A Simple UI With Streamlit
All code snippets of this section is taken from the project repo — ui.py.
Now, let's build a lightweight user interface around our API. We will start by writing a simple header section for our app with an arbitrary cover image:
import io

import numpy as np
import requests
import streamlit as st

API_ENDPOINT = "https://pet-pawpularity.herokuapp.com/predict"

# Create the header page content
st.title("Pet Pawpularity Prediction App")
st.markdown(
    "### Predict the popularity of your cat or dog with machine learning",
    unsafe_allow_html=True,
)

# Upload a simple cover image
with open("data/app_image.jpg", "rb") as f:
    st.image(f.read(), use_column_width=True)

st.text("Grab a picture of your pet or upload an image to get a Pawpularity score.")
Next, we define the core functionality. We will create a function that produces a cuteness score by sending a request to our API:
from PIL import Image


def predict(img):
    """
    A function that sends a prediction request to the API and return a cuteness score.
    """
    # Convert the bytes image to a NumPy array
    bytes_image = img.getvalue()
    numpy_image_array = np.array(Image.open(io.BytesIO(bytes_image)))

    # Send the image to the API
    response = requests.post(
        API_ENDPOINT,
        headers={"content-type": "text/plain"},
        data=str(numpy_image_array),
    )

    if response.status_code == 200:
        return response.text
    else:
        raise Exception("Status: {}".format(response.status_code))
Images uploaded to Streamlit apps will have a 'BytesIO' format, so we need to convert them to a NumPy array first. Lines 6–7 accomplish this, and the rest is fairly self-explanatory.
Now, we create two image input components — one for file uploads and another for a web-cam input:
def main():
    img_file = st.file_uploader("Upload an image", type=["jpg", "png"])
    if img_file is not None:

        with st.spinner("Predicting..."):
            prediction = float(predict(img_file).strip("[").strip("]"))
            st.success(f"Your pet's cuteness score is {prediction:.3f}")

    camera_input = st.camera_input("Or take a picture")
    if camera_input is not None:

        with st.spinner("Predicting..."):
            prediction = float(predict(camera_input).strip("[").strip("]"))
            st.success(f"Your pet's cuteness score is {prediction:.3f}")


if __name__ == "__main__":
    main()
When used, both of these components will display a simple animation for standby and then returns a cuteness score. Here is our app in action:

Now, after you've pushed these changes to GitHub, you can deploy your app online by going to https://share.streamlit.io/deploy:
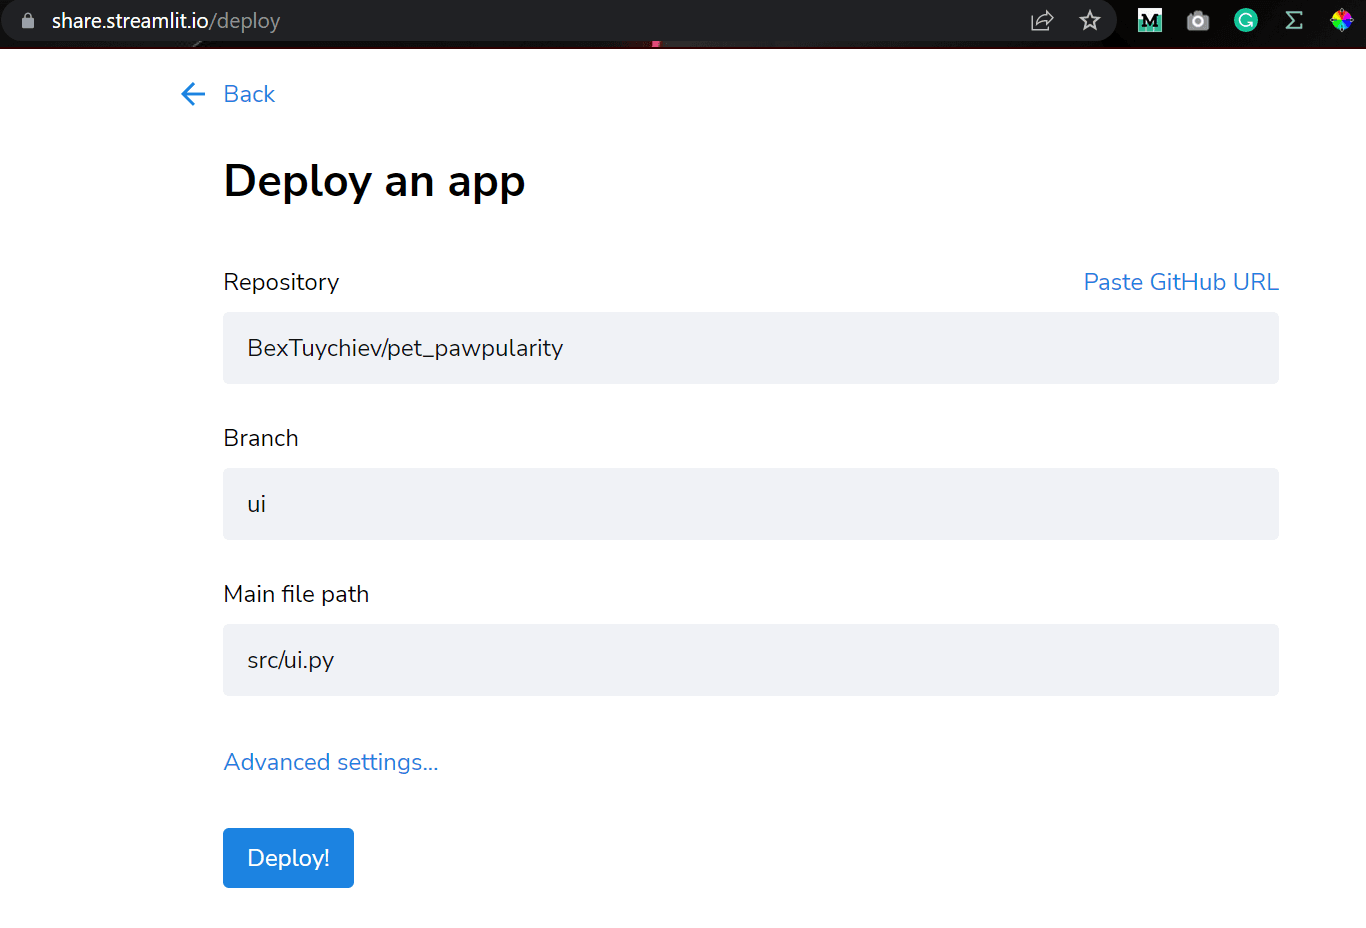
Here is a link to the deployed app: https://share.streamlit.io/bextuychiev/pet_pawpularity/ui/src/ui.py
Conclusion
Congratulations! You've just built an entire image application with an awesome UI for everyday users and its own API for your programmer friends or teammates. Now, you have a reliable way of sharing your models with others without worrying about environment setup and code.
Thank you for reading!