Deploying Your Own Stable Diffusion Service
Sep 23, 2022 • Written By Bozhao Yu
⚠️ Outdated content
Note: This blog post is outdated. To deploy diffusion models, refer to the BentoML documentation.
Stable Diffusion is an open-source text-to-image model released by stability.ai. It enables you to generate creative arts from natural language prompts in just seconds.
Why Do I Want To Bring Stable Diffusion Online?
With limited local compute resources, the Stable Diffusion model takes a long time to generate quality images. Running the model online using a cloud service gives us access to practically unlimited compute resources and enables us getting quality results much faster. Hosting the model as a microservice also allows other creative applications to more easily leverage the power of the model without having to deal with the complexity of running ML models online.
Deploying Stable Diffusion On EC2
One way to host the Stable Diffusion model online is to use BentoML and AWS EC2. BentoML is an open-source platform that enables building, deploying, and operating machine learning services at scale. In this article, we will create a production-ready Stable Diffusion service with BentoML and deploy it to AWS EC2. Here’s a sneak peek of what you will get following the steps in this article.
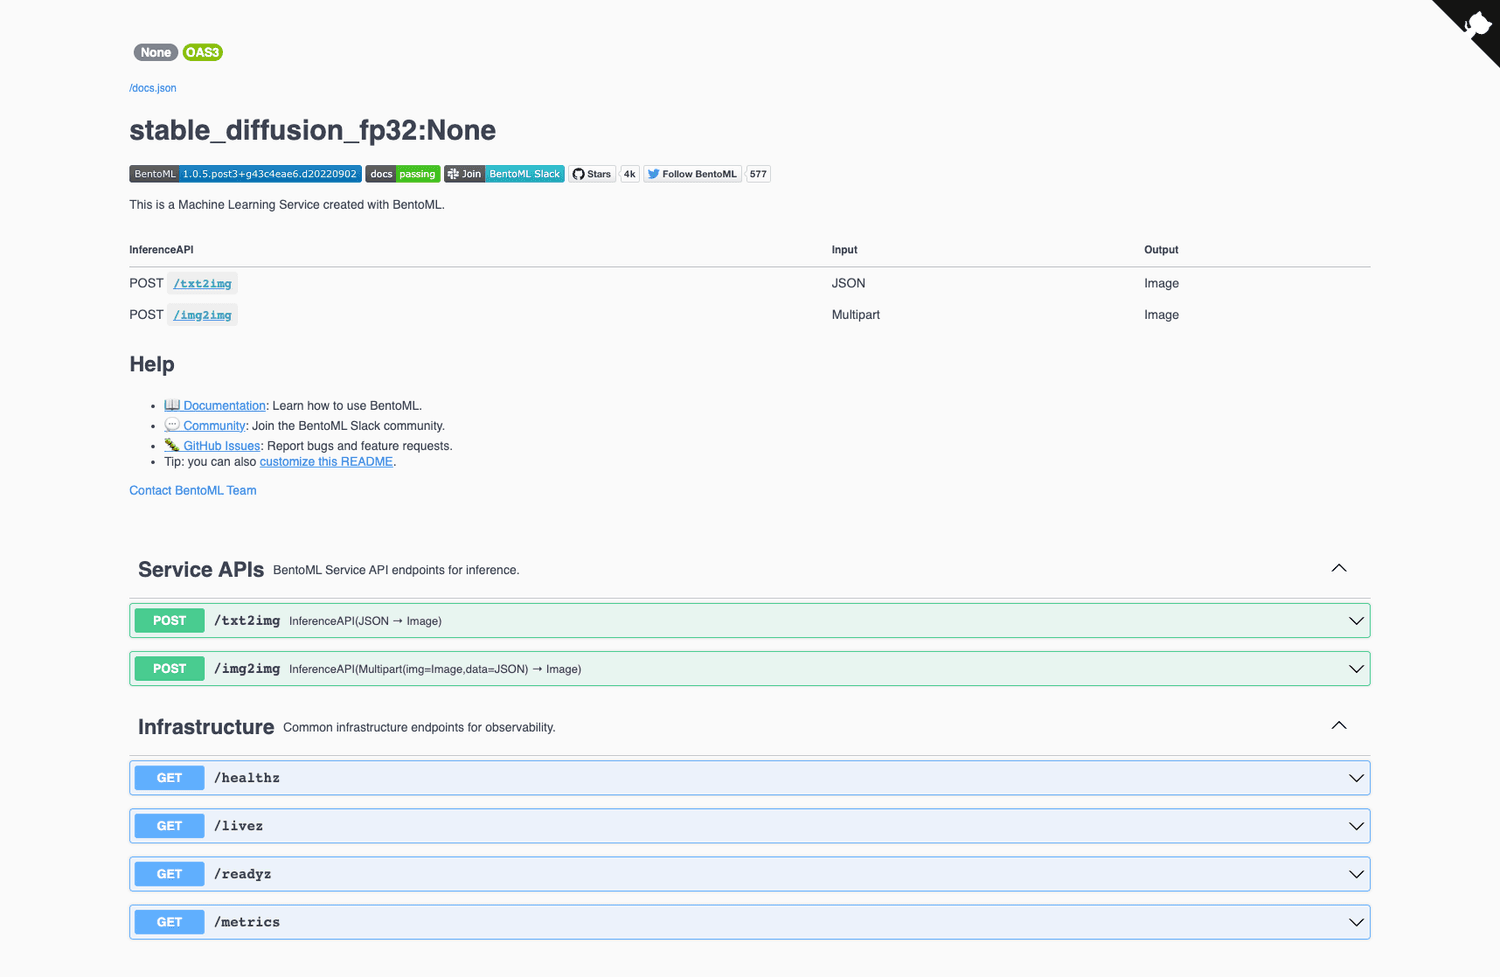
A RESTful OpenAPI service with both /txt2img (text to image) and /img2img (image + text to image) endpoints behind a Swagger user interface.

Example images generated from text prompts using the /txt2img endpoint.
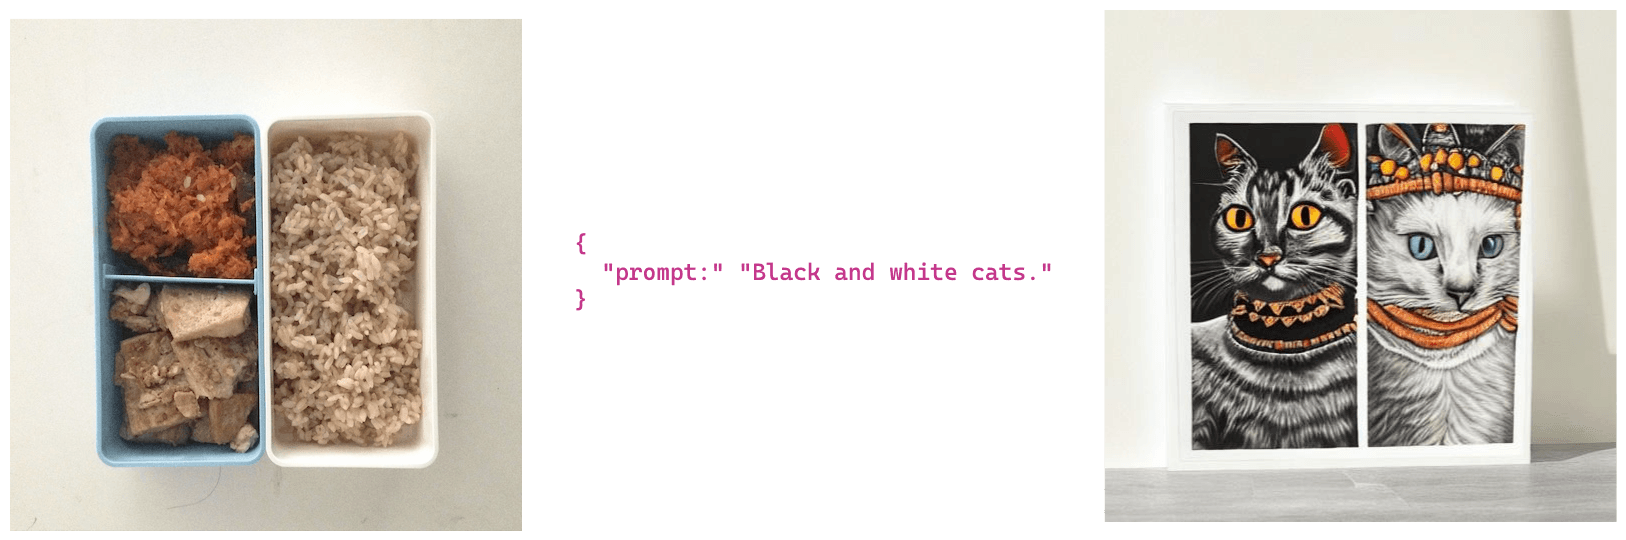
Example images generated from image and text prompts using the /img2img endpoint.
Prerequisites
Python 3.9 or above
• AWS CLI
• BentoML
• bentoctl
• Docker
Code and samples in this articles can be found in https://github.com/bentoml/stable-diffusion-bentoml.
Prepare Environment And Stable Diffusion Model
Clone repository and install dependencies.
git clone https://github.com/bentoml/stable-diffusion-bentoml.git && cd stable-diffusion-bentoml
python3 -m venv venv && . venv/bin/activate
pip install -U pip
pip install -r requirements.txt
Choose and download the Stable Diffusion model. Single precision is best for CPUs or GPUs with more than 10GB of VRAM. Half precision is best for GPUs with less than 10GB VRAM.
Single Precision (FP32)
cd fp32/
curl https://s3.us-west-2.amazonaws.com/bentoml.com/stable_diffusion_bentoml/sd_model_v1_4.tgz | tar zxf - -C models/
Half Precision (FP16)
cd fp16/
curl https://s3.us-west-2.amazonaws.com/bentoml.com/stable_diffusion_bentoml/sd_model_v1_4_fp16.tgz | tar zxf - -C models/
Build The Stable Diffusion Bento
To serve the model behind a RESTful API, we will create a BentoML service. The following example uses the single precision model for prediction and the service.py module for tying the service together with business logic. We can expose the functions as APIs by decorating them with @svc.api. In addition, we can specify the input and and output types of the APIs in the arguments. For example, the txt2img endpoint accepts a JSON input and returns an Image output, whereas the img2img endpoint accepts an Image and a JSON as input and returns an Image as output.
@svc.api(input=JSON(), output=Image())
def txt2img(input_data):
    return stable_diffusion_runner.txt2img.run(input_data)

@svc.api(input=Multipart(img=Image(), data=JSON()), output=Image())
def img2img(img, data):
    return stable_diffusion_runner.img2img.run(img, data)
The core inference logic is defined in a StableDiffusionRunnable. The runnable is responsible for calling the txt2img_pipe and img2img_pipe methods on the model and passing in the necessary arguments. A custom Runner is instantiated from the StableDiffusionRunnable for executing the model inference logic in the APIs.
stable_diffusion_runner = bentoml.Runner(StableDiffusionRunnable, name='stable_diffusion_runner', max_batch_size=10)
Next, run the following command to bring up a BentoML service for testing. Running the Stable Diffusion model inference locally with CPUs is quite slow. Each request will take roughly 5 minutes to complete. In the next section, we will explore how to accelerate the inference speed by running the service on a machine with GPUs.
BENTOML_CONFIG=configuration.yaml bentoml serve service:svc
Curl the text-to-image /txt2img endpoint.
curl -X POST http://127.0.0.1:3000/txt2img -H 'Content-Type: application/json' -d "{\"prompt\":\"View of a cyberpunk city\"}" --output output.jpg
Curl the image-to-image /img2img endpoint.
curl -X POST http://127.0.0.1:3000/img2img -H 'Content-Type: multipart/form-data' -F img="@input.jpg" -F data="{\"prompt\":\"View of a cyberpunk city\"}" --output output.jpg
Required files and dependencies are defined in the bentofile.yaml file.
service: "service.py:svc"
include:
  - "service.py"
  - "requirements.txt"
  - "models/v1_4"
  - "configuration.yaml"
python:
  packages:
    - torch
    - transformers
    - diffusers
    - ftfy
docker:
    distro: debian
    cuda_version: "11.6.2"
    env:
      BENTOML_CONFIG: "src/configuration.yaml"
Build a bento with the command below. A Bento is the distribution format for a BentoML service. It is a self-contained archive that contains all the files and configurations required to run the service.
bentoml build
🎉 The Stable Diffusion bento has been built. If for any reason you were unable to build the bento successfully, worry not, you can download our pre-built bentos with the commands below.
Download Single Precision (FP32) Stable Diffusion Bento
curl -O https://s3.us-west-2.amazonaws.com/bentoml.com/stable_diffusion_bentoml/sd_fp32.bento && bentoml import ./sd_fp32.bento
Download Half Precision (FP16) Stable Diffusion Bento
curl -O https://s3.us-west-2.amazonaws.com/bentoml.com/stable_diffusion_bentoml/sd_fp16.bento && bentoml import ./sd_fp16.bento
Deploy The Stable Diffusion Bento To EC2
We will be using bentoctl to deploy the bento to EC2. bentoctl helps deploy your bentos into any cloud platforms through Terraform. Install the AWS EC2 operator to generate and apply the Terraform files.
bentoctl operator install aws-ec2
The deployment has already been configured in the deployment_config.yaml file. Please feel free to update to your specification. By default, it is configured to deploy the Bento on a g4dn.xlarge instance with the Deep Learning AMI GPU PyTorch 1.12.0 (Ubuntu 20.04) AMI on the us-west-1 region.
api_version: v1
name: stable-diffusion-demo
operator:
  name: aws-ec2
template: terraform
spec:
  region: us-west-1
  instance_type: g4dn.2xlarge
  # points to Deep Learning AMI GPU PyTorch 1.12.0 (Ubuntu 20.04) 20220913 AMI
  ami_id: ami-0a85a3a3fb34b3c7f
  enable_gpus: true
Generate the Terraform files.
bentoctl generate -f deployment_config.yaml
Build the Docker image and push to AWS ECR. Image upload may take a long time depending on your bandwidth.
bentoctl build -b stable_diffusion_fp32:latest
Apply the Terraform files to deploy the bento to AWS EC2. You can navigate to the EC2 console and open the public IP address from the browser to access the Swagger UI.
bentoctl apply -f deployment_config.yaml
Finally, delete the deployment if the Stable Diffusion BentoML service is no longer needed.
bentoctl destroy -f deployment_config.yaml
Conclusion
In this article, we built a production-ready service for Stable Diffusion using BentoML and deployed it to AWS EC2. Deploying the service on AWS EC2 allowed us to run the Stable Diffusion model on more powerful hardware, generate images with low latency, and scale beyond a single machine. If you enjoyed reading the article, please show your support by ⭐ the BentoML project on GitHub and join the Slack community to meet more like-minded people.